2018年1月30日星期二

How to Install Cummins Insite Pro V8.2.0.184 Insite Cummins Software

Cummins Insite Pro software have newly update to Cummins Insite V8.2.0.184 Software .Insite Cummins V8.2.0.184 work for Cummins INLINE 5 Data Link Adapter /Cummins Inline 6 data link/ Nexiq etc.For some customers dont knwo where do download and how to install the Cummins Insite software.Bellow, OBD2repair.com share you Cummins Instite Pro V8.2.0.184 Cummins Insite Software Free Download & Install Guide.

Cummins INSITE 8.2.0.184 Software Pro Version with 500 Times

Cummins INSITE 8.2.0.184 Software download
Works on win7 8 10 (Win10 run as administrator)

Very Important:
Uninstall any anti-virus software programs, firewall, etc.

Detail Steps about How to Install Cummins Insite Pro V8.2.0.184 Insite Cummins Software

Step 1: setup Inline 5 driver on Win 7 32bit
This is Windows 7 32-bit.
f:id:OBD2repair:20180131122940p:plain

Open software CD
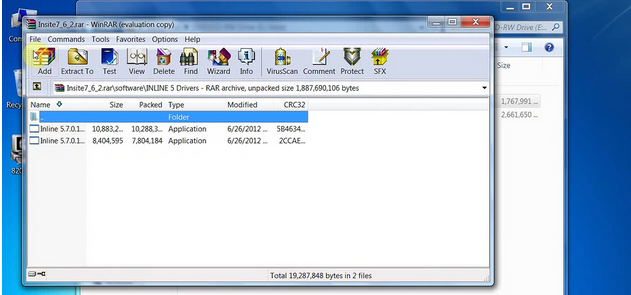
Open INSITE.7_6_2.rar-> Software folder->INSITE 5 Drivers
f:id:OBD2repair:20180131123045p:plain
f:id:OBD2repair:20180131123112p:plain


Copy and paste Inline 5.7.0.1 Setup- 32 Bit.exe on the desktop.
If you have 64-bit system, copy and paste Inline 5.7.0.1 Setup- 64 Bit.exe on the desktop
f:id:OBD2repair:20180131123138p:plain
Install the Cummins Inline5 data link adapter driver (Inline 6, Nexiq or other adapters can work too)
Run Inline 5.7.0.1 Setup-32 Bit as administrator 
f:id:OBD2repair:20180131123155p:plain


Click on NEXT
f:id:OBD2repair:20180131123232p:plain

Get windows security warning, accept it and continue setup the driver software
f:id:OBD2repair:20180131123251p:plain

Tick “Launch Inline 4/5 Reflash Tool” and click on Finish
Delete the “Inline 5.7.0.1 Setup-32 Bit on desktop
Device driver has been successfully installed
f:id:OBD2repair:20180131123309p:plain
f:id:OBD2repair:20180131123334p:plain
Open Computer->Manager->Device Manager->Universal Serial Bus Controller, to check whether the driver has been established a good communication with the computer.
f:id:OBD2repair:20180131123407p:plain
Step 2: Add Inline5 adapter to INSITE 8.2.0
Open INSITE 8.2.0.184 pro or lite version software on the desktop
f:id:OBD2repair:20180131123444p:plain
Select the option “Add New on the middle of the bottom tool bar
f:id:OBD2repair:20180131123511p:plain
Click on “Next” to install ECU Connection Wizard
f:id:OBD2repair:20180131123542p:plain
Select RP1210 adapters, click on Next
f:id:OBD2repair:20180131123556p:plain
Select Vendor, Adapter INLINR 5 USB and protocol Auto detect, click on Next
f:id:OBD2repair:20180131123608p:plain

Click on Next
f:id:OBD2repair:20180131123702p:plain
Tick both 2 options and click on Finish
One more time, the software will ask to install ECU connection wizard, click on NEXT
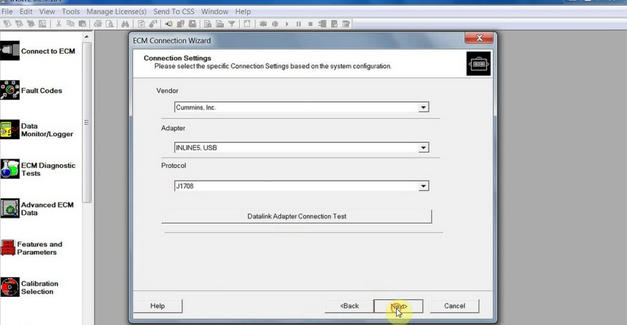
Setting one more time and select the protocol J1708.
f:id:OBD2repair:20180131123725p:plain

Click on Finish
Setting one more time and add protocol J1939
f:id:OBD2repair:20180131123754p:plain
Click on Finish and cancel the ECU connection wizard interface
f:id:OBD2repair:20180131123810p:plain
Please add the corresponding adapter in the Insite software
f:id:OBD2repair:20180131123828p:plain

Select “INLINES USB (Auto Detect) Connection” in the middle of bottom tool bar
f:id:OBD2repair:20180131123853p:plain

Click on the “Connect” button to connect to ECM

Start to use the Insite Cummins Pro V8.2.0.184 software to read fault code, manage data logger, do calibration etc
f:id:OBD2repair:20180131123951p:plain
f:id:OBD2repair:20180131124023p:plain
f:id:OBD2repair:20180131124044p:plain


Focus On OBD Tool Since 2008

More detail about insite cummins V8.2.0.184,pls connect
Website:www.obd2repair.com
Skype:obd2repair / eobdscan1
We Chat/ Whatsapp (+86)13728823163
Email: info@obd2repair.com
Facebook: www.facebook.com/obd2repaircom/

2018年1月29日星期一

How to Do Odometer Correction with DSP3 Mileage Correction Tool via OBD Adapter


DSP3 Mileage Correction Tool is the 2018 new Odometer Correction tool for high-end  cars till 2017.DSP3 Odometer Correction support Mileage Programming via OBD adapters directly.OBD2repair.com share you how to do Odometer Correction with DSP3 Mileage Correction Tool via OBD adapter following.

Super DSP III Odometer Correction Tool DSP3 Mileage Correction Tool OBD Tool


How to correct odometer with DSP3 Odometer Correction Tool via OBD adapters:

Connect the OBD or other adapter with DSP3
Select Odometer
f:id:OBD2repair:20180129180842p:plain
Select a model to change km (Here: BMW)
f:id:OBD2repair:20180129181217p:plain
Choose 3 SERIES 2001-2003

f:id:OBD2repair:20180129181413p:plain
f:id:OBD2repair:20180129181428p:plain
Connect a proper adapter to the target odometer pcb

f:id:OBD2repair:20180129181447p:plain
power off
Plug the proper adapter into the main hardware by the Adapter-Socket
f:id:OBD2repair:20180129181533p:plain
Load program and load OK
f:id:OBD2repair:20180129181544p:plain
Read and save current data

f:id:OBD2repair:20180129181618p:plain
Read KM, then change km
f:id:OBD2repair:20180129181644p:plain
f:id:OBD2repair:20180129181658p:plain
Write km success!
f:id:OBD2repair:20180129181718p:plain


IMPORTANT NOTE 1: DSP 3 Plus & BSI correction
Before correction of some odometers, you have to reset BSI module first, such as ‘peugeot 307’, you should select ‘BSI’ and reset the km to zero, then adjust the km of odometer.
f:id:OBD2repair:20180129181739p:plain
f:id:OBD2repair:20180129181748p:plain
IMPORTANT NOTE 2: DSP III Plus & LCM/ EWS/ CAS unit correction
Before correction of some BMW odometers you have to reset the km in LCM/ EWS/ CAS module first, this operation is similar to odometer adjustment.
f:id:OBD2repair:20180129181805p:plain


f:id:OBD2repair:20180129181944p:plain

IMPORTANT NOTE 3: Super DSP 3+ & EZS correction
Before correction of some BENZ odometers you have to reset the km in EZS module first, this operation is similar to odometer adjustment.
f:id:OBD2repair:20180129182023p:plain

f:id:OBD2repair:20180129182034p:plain

Focus On OBD Tool Since 2008

More detail about DSP3 Odometer Correction Tool ,pls connect
Website:www.obd2repair.com
Skype:obd2repair / eobdscan1
We Chat/ Whatsapp (+86)13728823163
Email: info@obd2repair.com
Facebook: www.facebook.com/obd2repaircom/

2018年1月26日星期五

How to Solve VOLVO Tech Tool Software Show "Older electrical system"


Premium Tech Tool PTT 2.5.86 is the last official version Volvo TechTool Development maximal authorized software.Multi-language Volvo Tech Tool PTT 2.5.86 software work with nexiq, xtruck, DPA4+, DPA5,Vocom, 88890020, Noregon trucks till 2017. Some customers get trouble when use the  VOLVO Tech Tool Software.OBD2repair.com will show you how to solve the VOLVO Tech Tool Software Show "Older electrical system"


Volvo/Renault/Mack Premium Tech Tool PTT 2.5.86 (FH4-FM4) (With APCI+ Update)


Volvo Tech Tool PTT 2.5.86 Software Problem:

Does anybody can provide a manual how to use Premium Tech Tool?
I’ve got a 2011 VN at the shop yesterday that is connecting to PTT 2.5.87 and PTT 2.4.87 as older electrical system. I run this tool (with PTT closed), enter the chassis ID, select VERSION2 and the tool showed me “Done” after some time. But once i’ve connected to the truck it still being showed as older system. I’ve tried to enter chassis ID as N****** and N ****** but with no luck. Both PTT seems working good as it was installed by trusted forum member and i have no problems with other trucks.

Volvo Tech Tool Volve Ptt 2.5.86 Software Solution:

Step 1, Open Volvo Tech Tool, system detected OLD ELECTRICAL SYSTEM, click finish job.
– FIRST clean/remove HISTORY on LATEST SELECTION . DONT CLOSE Tech Tool!.

Step 2, Run OLD2V2 TOOL
-put chassis ID : full chassis number like this, example :YVAM390985Y036312
-select version 2 or version 3 (depend on your truck)
-hit button SET, Tech Tool will close automatic!.
-waiting until appear DONE. press it.

Step 3, Open Tech Tool back, reconnect, still detect OLD ELECTRICAL SYSTEM, don’t panic
-DONT CLICK ANY SELECTION, just view and click FINISH JOB. Don’t close Tech Tool.
-PULL OUT THE DIAGNOSTIC CABLE FROM THE TRUCK’S SOCKET AT BELOW DRIVER SIDE, (NOT USB CABLE AT LAPTOP !!) and THEN RECONNECT IT BACK.

Step 4, Wait, Tech Tool automatically will detect/retrieve NEW CONNECTION and we can change to VERSION 2 or 3 on popup MANDATORY selection box,

DONE!

Just enjoy it!

Focus On OBD Tool Since 2008

More detail about volvo tech tool  ,pls connect
Website:www.obd2repair.com
Skype:obd2repair / eobdscan1
We Chat/ Whatsapp (+86)13728823163
Email: info@obd2repair.com

Facebook: www.facebook.com/obd2repaircom/ 


2018年1月23日星期二

Ktag Master Ktag 7.020 ECU Programming Tools Firmware Update Guide

Ktag 7.020 is the latest ktag ECU Programming Tools with nolimited tokens.Ktag 7.020 with ktag software v2.23 new add least 100 more ECU Types.Ktag 7.020 ktag master can work online.OBD2repair.com share you how to Update Ktag Master Ktag ECU Programming Tools Firmware to Ktag 7.020.

Updating Ktag firmware to 7.020 version doesn’t block processor.
For correct operation device it is necessary to change CID SDcard on 035344535330344780399b1368010300
This procedure is supported by not each SDcard.

Programs for change of CID and the description of process easy to find in the Internet.
I used mmc32 and evoplus_cid from github. This programs for linux. I haven’t found soft working in Windows

It is difficult to find SDcard which supports change CID.
SDcards with built-in chipset of production Samsung meet such requirements.
…or buy on Alibaba, using search “CUSTOM CID”.
f:id:OBD2repair:20180124124651p:plain

Ktag 7.020 Ktag ECU Programming Tools Firmware:
CID SDcard: 035344535330344780399b1368010300

Firmware_7.020: https://mega.nz/#!rUdDnYDA!RrHb5a8CcksLq22Yl9r-sjwZ-FUfAZV44odW-1N62xQ

Ksuite_2.23: https://mega.nz/#!OZVWVKaB!69SeNOiikVGqZLx2Fxy7-KMZ4s7-0Zi9WjzDCFQSL1s

mmc32: https://mega.nz/#!DFN2DLBb!-xLw3pgRAULLx3ggvo7WKAbwCHSjypwZyaLoD9-XuKE

KTAG_7.020_SDcard_img:
https://mega.nz/#!7FVwVbjK!HPNbm12Bb4nuYtOoSFmTJQDL–LejDRixGT_0ytmpSw

Ktag 7.020 Ktag ECU Programming Tools Update FAQs:
Q: for upgrade ktag with 6.070 required change nxp whit crp3 status?:
A: if you use Jlink to you necessary level not above CRP1
if you use usb-com to you necessary level not above CRP2

Q: tool trick is test unlock whit airflow?
A: Yes, but sometimes it’s easier to replace LPC with new device.

Q: trick airflow whit my kess not work…send me instruction for test on ktag and i’m test trick on ktag…thanks. And i have a question…problem is my ftdi interface?
A: I think most simply to change NXP processor.
…temperature destroys the processor
It is very doubtful method

Q: After you change cid copy image with sd
A: cloning of SDcard is a big problem now
I will do SDcard for CID

Q: what linux system did you use?
A: linux version will not matter
Q: what program do the card image sd ??
A: I used mmc32 and evoplus_cid from github. This programs for linux.

Q: i have samsung 64gb change the cid an uplad the bin but all i have is this on the picture. any ideas?
A: use up to 8gB card. And check all Made in Korea for rewritable CID

Q: what was the hardware problem ???
A: not all china clones are the same, mine is missing a few components
with ktag 6.070 not have problems
there is free rework guide on the net
so i add them and all ok

Q: Can you share usb-com connections?
A: Here you go

OBD2repair.com NOTE:
Good experienced technique is required. YOU ARE TRYING ALL ON YOUR OWN RISK. If you want a Ktag firmware 7.020 with relief and use it with security, go for a tested and working one – RED Ktag 7.020 is cost-effective. Look here:
Confirmed! Working no issues!

Ktag V7.020 Ktag Master V2.23 ECU Programming Tools Unlimited Tokens Work Online with Red PCB
ktag master

Focus On OBD Tool Since 2008

More detail about ktag master ktag 7.020 ECU programming tools ,pls connect
Website:www.obd2repair.com
Skype:obd2repair / eobdscan1
We Chat/ Whatsapp (+86)13728823163
Email: info@obd2repair.com
Facebook: www.facebook.com/obd2repaircom/

2018年1月15日星期一

Solution of MDI Interface WIFI GM MDI Diagnostic Interface Error“No Connection”

GM MDI Multiple Diagnostic Interface works for all Vauxhall /Opel 16 pin vehicles from 1996 to 2017.WIFI GM MDI interface with Global TIS, GDS 2, Tech2Win software.OBD2repair.com share you how to solve MDI Interface GM MDI Error“No Connection”


GM MDI Tech 3 WIFI GM MDI Scanner MDI Tech3 Wireless GM Tech 3


GM MDI Interface Problem:


When get the GM MDI interface connected with computer and plugged into car’s DLC OBD port, only two of the indicator light flashed while the other two are off. And then the GM MDI software system displayed “no connection” error message. See Fig.1 and Fig. 2.
gm mdi

gm mdi


Possible Reason:
Improper operation procedure leads to the communication failure.

OBD2repair.com Solution of MDI Interface GM MDI Error“No Connection” :

Quit the GM MDI software and disconnect the GM MDI main unit
Open MDI Manager to check the driver
Open “Network setup” to check the network condition
If your MDI Manager shows a connection with your MDI and says software is compatible with pc, it is OK.
Reconnect the MDI device and load software again.

Follow the correction connection procedure and settings:

USB connection:

Once install and run the MDI manager, power up the MDI tester using the A/C 12-volt adapter. Then connect it to your computer with via USB cable.  The MDI appears in the application’s Explorer window where all the MDI units detected by your PC.


Detail Steps about WIFI Wireless Connection Guide :

1) Click MDI_Manager icon to start the MDI Manager software
2) Connect MDI with PC using USB cable
3) Power on the MDI by plugging in the A/C 12-volt adapter
4) Select and Connect to your MDI in the MDI Manager software MDI Explorer tab.
5) Select “Network Setup”
6) Select “Wireless” tab.
7) Select “Enable Wireless Interface check box in the Interface Control box to enable the interface. Once you enable the interface, the IP Address Configuration box and the Apply and Cancel buttons become active.
8) Select Obtain an IP address automatically if your LAN automatically assigns IP addresses. Otherwise enter the assigned IP Address and Subnet mask.
9) Select “Access Point” to start wireless access configuration.
10) If you are not within range of the access point you want to use, or the access point is not broadcasting its SSID, select the Enter Network Name [SSID]: radio button and type the network name.
11) If you are within range of your wireless access point, choose the Select from available network list radio button and then select Refresh to cause the MDI to search for wireless network signals. The detected networks are displayed in the Network Name box.
12) Select Configure after you have entered the network name
13) Enter the security setting that are required by your network, then select Next.
14) Select Yes to re-configure your MDI, or if you want to start over select No.
15) Select OK.
16) Choose the Properties tab to verify that the MDI is configured correctly.
17) Write down previous settings you did for future reference.

OBD2repair.com NOTE:

Installing the MDI Manager software installs certain utilities that are required for your TIS2Web programs to use the MDI. But, it is not necessary to start the MDI Manager software before using TIS2Web programs.


Focus On OBD Tool Since 2008

More detail about GM MDI 3 GM Scanner,pls connect
Website:www.obd2repair.com
Skype:obd2repair / eobdscan1
We Chat/ Whatsapp (+86)13728823163
Email: info@obd2repair.com
Facebook: www.facebook.com/obd2repaircom/

Can Clip Renault V 188 Can Clip Software Free Download on Mega

Renault Can Clip is   the professional diagnostic tool for Renault with multi-language.For Renault clip diagnostic tool software support upd...